DIY Pom Pom Pillows
by Erica in D.I.Y.


If you don’t know by now, Lauren and I are obsessed with pom poms. Discovering the almighty pom pom maker when we first started HonestlyWTF a few years ago was an absolute game changer. Pom pom birthday garlands, pom pom gift tags, pom pom luggage tags, pom pom beanies, pom pom bag charms . . . for awhile there wasn’t a single thing protected from our pom pom craze. Except pillows. After recently lusting over a traditional Moroccan blanket, adorned with giant, fluffy pom poms, I was instantly inspired. My new outdoor sofa was in desperate need of some color and fluff and adding them to a handful of pillows, with Hmong and Guatemalan fabrics I had on hand, was a no brainer.

You’ll need:
- a few yards of vintage fabric
- a few yards of heavy linen
- a sewing machine
- a zipper foot
- a small pom pom maker
- a few skeins of yarn
- thread
- needle
- pins
- fabric shears

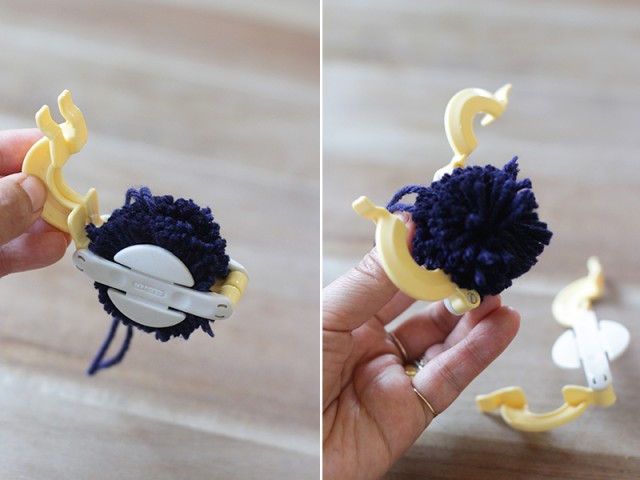
Start by making your pom poms. The pom pom maker comes in 2 parts, each that sandwich together with two moving arches. Keep all the parts closed when making a pom pom. For a small pom pom, take 2 yards of yard and fold it in half. Open one set of arches and wrap the yarn around it.
Close the arch.
Repeat on the other side. Take a pair of sharp shears and cut along the middle ridge of the pom pom maker around the entire circle.
Take 6 inches of yarn and slide it through the middle of the pom pom maker. Tie into a tight double knot.
Open the swinging arches and separate the two sides of the pom pom maker. Your pom pom is finished! All you need to do it take a pair of shears and give the ball a bit of a trim if necessary. Just be sure not to trim the tie, that ties it all together – you’ll need that for the next step!
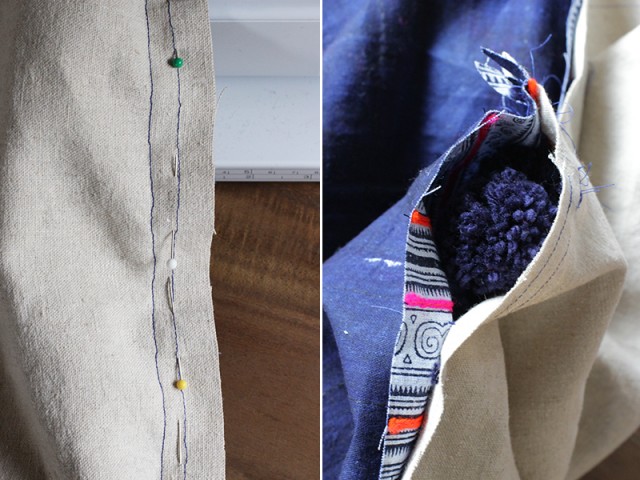
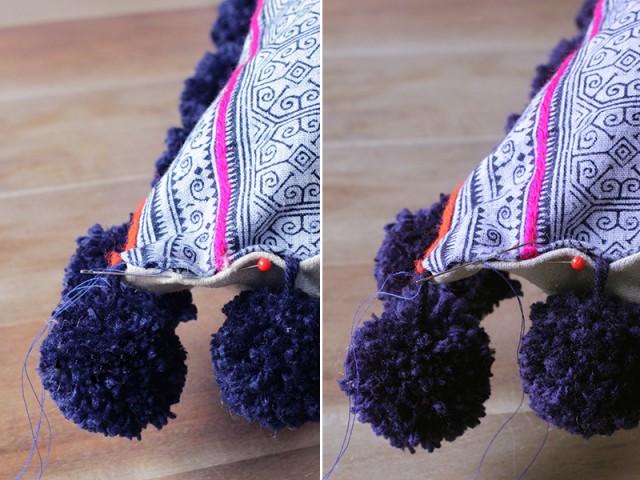
Cut 2 pieces of fabric at the same size – I used a piece of vintage fabric on top and heavy duty linen on the bottom. Pin the pom poms, with the pom poms facing in, to the outer edge of the bottom fabric. The base of the pom poms should be about 3/4″ from the edge.
Sew the pom poms onto the fabric with a 1/4″ seam allowance and a straight stitch. Be sure that you have your zipper foot attached.
Once all the pom poms have been sewn on, lay the patterned fabric over the top and pin closed.
Sew the pillow closed – this time with a 1/2″ seam allowance. I recommend that you stick your finger between the two sheets to adjust the pom poms to prevent sewing them into the pillow. Leave a 3 inch opening on one side of the pillow and turn the pillow inside out.
Fill the pillow with handfuls of poly stuffing.
Once the pillow is full, fold the seams of the opening inwards and pin them closed. A blind ladder stitch will close it seamlessly. Take needle and thread, knot the two tail ends together in a double knot. Push the needle up and through the end of one of the folded seams. Now take the needle and grasp a tiny piece of fabric along the seam crease, across from the seam crease from which you started.
When the thread is pulled through, you will notice that the stitch is concealed within the seam crease, and there will be a horizontal stitch connecting the left and right sides of your opening. Continue stitching back and forth, grasping a piece of fabric along the seam crease and pulling tightly.
Your pillow is sealed and finished!!
You can always add pom poms just on the corners of the pillows.
Hooray for pom poms!!
(images by HonestlyWTF)
by:honestlywtf.com/diy